
If you want your stream to feel more interactive, polished, and memorable, alerts are one of the first things you should set up correctly. A good alert does more than pop onto the screen. It helps viewers feel seen, reinforces your visual branding, and adds energy to the moments that matter most, such as a new follow, subscription, donation, or raid.
This guide explains how to set up Streamlabs alerts in Streamlabs Desktop step by step. It covers adding the Alert Box widget, customizing the alert settings for each event type, uploading your own alert graphics and sounds, changing text formatting, testing every alert, and fixing the most common issues that stop alerts from working properly.
From our experience helping streamers set up purchased packages, the most common alert problems are missing media files, broken widget themes, incorrect text formatting, alert durations that do not match the animation length, and testing only one event type instead of all of them. Alerts look simple on the surface, but the details matter.
If you want a setup that looks professional and works consistently, this page will walk you through the process clearly.
Streamlabs alerts are on-screen notifications that appear when a viewer triggers an event connected to your stream. Depending on your platform and connected features, these events can include follows, subscriptions, donations, raids, memberships, tips, bits, and more. Streamlabs’ official setup flow centers around adding an Alert Box source to your scene and then customizing alert behavior by event type.
A complete alert usually includes:
Some streamers use the default Streamlabs look, but if you want your stream branding to feel consistent, custom alerts are usually the better choice.
This guide is for you if:
It is especially useful for streamers who want more than a basic default setup but do not want to waste time rebuilding their alert system later.
Before you configure alerts, make sure you have the basics ready.
You should have:
If you are using purchased alert files, keep them in one stable folder. One of the most common mistakes is moving the files after uploading them or mixing them into random folders. That makes future updates harder and increases the chance of broken paths or confusion when you later swap files.
A simple folder structure helps:
This sounds basic, but it saves a lot of frustration later.
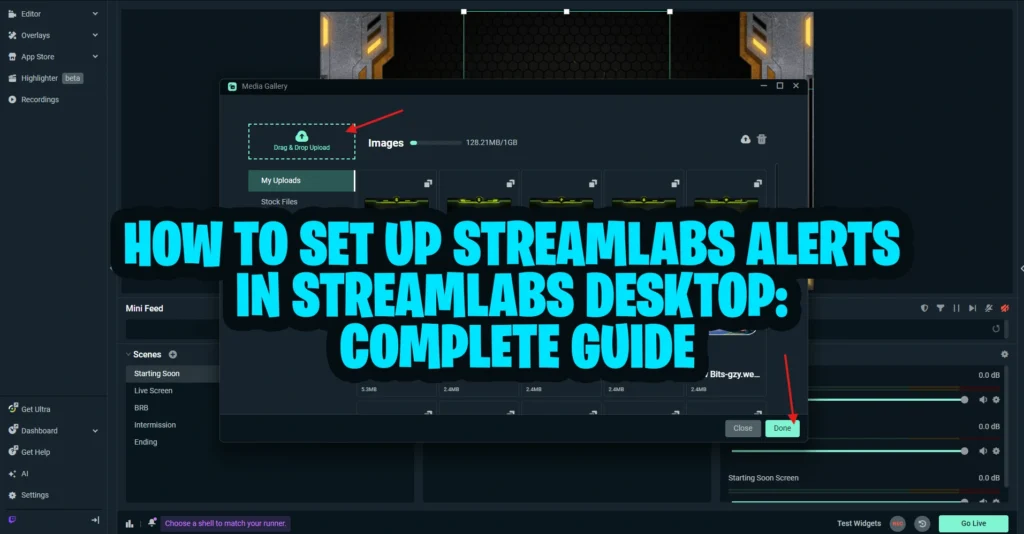
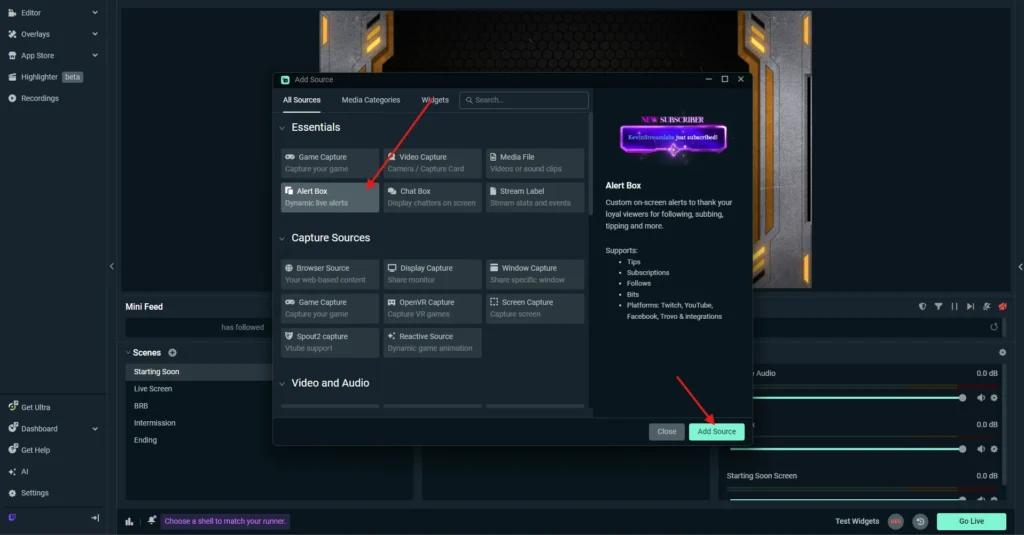
The first step in setting up alerts in Streamlabs Desktop is adding the Alert Box widget to the scene where you want alerts to appear. Streamlabs’ current setup documentation describes adding the Alert Box from the Sources area in Streamlabs Desktop.
If you want to compare this workflow with the official Streamlabs alerts guide, you can review their instructions for adding the Alert Box, editing alert settings, and testing each alert type.
If you do nothing else, Streamlabs will show its default alerts when supported events happen. That is useful as a starting point, but most streamers will want to customize the visuals, sounds, and text before going live.
Your Alert Box should sit in a visible area that does not block your core content. Good placement depends on your layout, but in most cases you want it:
If your overlay design already includes a dedicated alert space, align the Alert Box with that area rather than placing it randomly.
After adding the Alert Box source, open its settings and review the available event types. Streamlabs lets you customize alerts by event, so you do not need to apply the exact same look to everything. Their alert documentation specifically emphasizes customizing different event types and using test alerts to preview them.
Common alert types include:
A lot of streamers set up one alert and assume all the others will look correct too. That is where problems start.
For example:
Treat each alert type as a separate setup step.
This is where your alerts start looking like your brand instead of generic Streamlabs pop-ups. If you want a cleaner and more professional look, using custom stream alerts can make a big difference.
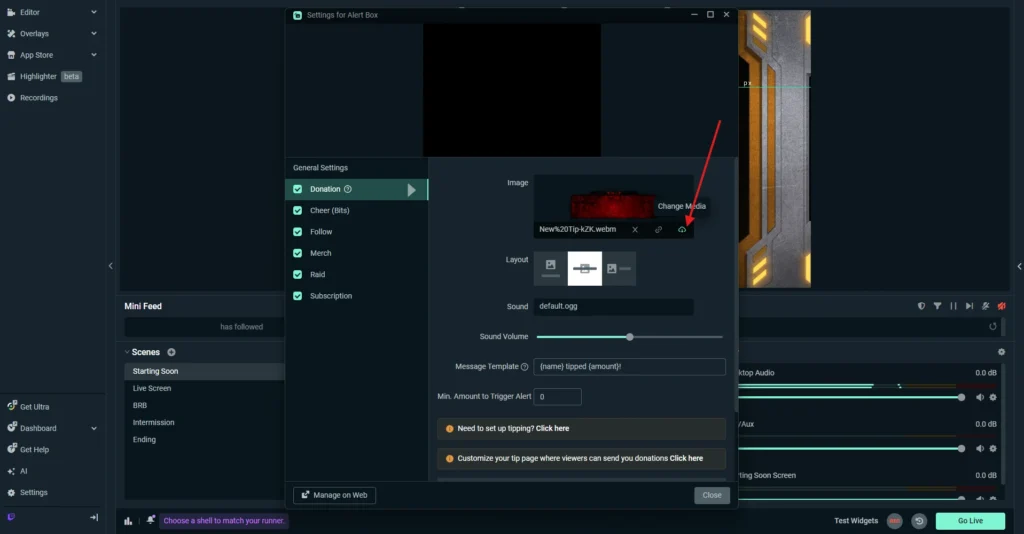
You can upload custom visual files for each alert type. Depending on your package, that may include:
Inside the settings for each alert type, look for the media or image area where you can replace the default alert visual with your own file. Streamlabs’ alerts guides and related help articles support changing graphics, sounds, and layout settings per alert type.

If your package includes multiple alert variations, install them one by one and test them separately.
Alert visuals matter, but text formatting is just as important. If the font, color, size, or placement is wrong, the alert can feel off-brand even if the animation looks great.
Streamlabs supports editing alert text settings, and their setup guidance also covers related features such as message templates and alert customization.
For each alert type, review:
If you use a custom design package, install the included fonts before editing the text. Missing fonts are one of the fastest ways to make a premium alert design look broken.
This is one of the most important parts of alert setup, and it is also one of the most overlooked.
A great alert can still feel wrong if the timing is off.
Alert duration controls how long the alert stays visible on screen.
Text delay controls when the alert text appears relative to the visual.
Your animation, sound, and text should feel like part of the same moment.
For example:
A good rule is to test each alert and then adjust duration and delay until the entire alert feels smooth and readable.
This is one of the biggest differences between “installed” alerts and “good” alerts.
Sound can make an alert feel exciting, but it can also make your stream feel chaotic if the levels are wrong. Streamlabs has dedicated guidance for changing Alert Box sounds after adding the widget.
You do not want your follow alert to sound like an explosion if the rest of your brand is calm and minimal. Likewise, you do not want your donation alert to be so quiet that nobody notices it.
If you want a cleaner, more organized alerts workflow, pay attention to Widget Themes. Streamlabs currently surfaces the active Widget Theme in the Alert Box area and lets you switch between recent themes or manage them from the themes interface.
Widget Themes help you:
If you are importing or creating a fresh alert design, it is smart to confirm which Widget Theme is currently active before making major changes.
Streamlabs also supports alert variations, which can help you create special versions of the same alert type under different conditions. Streamlabs’ own help content explains that variations can be enabled, disabled, edited, and tested separately.
This is useful if you want, for example:
If you do not need that level of customization, keep it simple. But if you want a more advanced setup, variations are worth learning.
This is the step too many streamers rush.
Testing is not optional. It is where you confirm that your alerts actually work as expected.
Streamlabs’ current help articles repeatedly emphasize using test alerts after configuration, and their troubleshooting flow also recommends retesting after fixes.
Run test alerts for each event type you plan to use:
Do not stop after one successful test. An alert system is only ready when all important event types have been checked.
Start with the basics:
If you use third-party widget URLs or changed tokens, Streamlabs’ troubleshooting guidance notes that refreshing tokens or re-adding widgets may be necessary in some cases.
This usually means:
Check the active theme first, then review the specific event settings again.
Open the sound settings for that alert type and confirm:
This usually points to:
Install the correct font, reopen the settings, and test again.
Adjust the duration and text delay until the animation, text, and sound feel like one complete experience instead of separate pieces.
That is common. Treat each event like its own mini setup. Fix and test them one by one.
If you want alerts that feel professional, not just functional, these habits help a lot:
A good alert setup should feel smooth, branded, and easy for viewers to understand instantly.
If you bought a custom alert pack, your setup process should still follow the same logic. And if you want your alerts to match the rest of your stream branding, a full stream package can help keep your overlays, alerts, and transitions visually consistent.:
The biggest difference is that you should take extra care to preserve the intended design style. That means:
This is where many streamers accidentally reduce the quality of a premium alert pack. The files may be good, but inconsistent setup makes them look less polished.
This page should stay focused on alerts only.
That makes it a strong supporting article for your broader Streamlabs content cluster:
That separation is good for both SEO and user experience because each page answers a clearer question.
If you want your stream to feel more alive, alerts are one of the highest-impact features you can set up.
They reward viewer interaction, strengthen your branding, and make your live moments feel bigger and more personal. But good alerts are not only about adding a flashy animation. They are about getting the details right: the widget, the media, the text, the sound, the timing, the theme, and the testing.
Once you understand how to set up Streamlabs alerts properly, future changes become much easier. You can swap media, refine sounds, create better variations, and troubleshoot problems without guessing.
That is the real benefit of doing the setup carefully now.
Add an Alert Box source to your scene, open its settings, configure each alert type, upload your custom media, change text and sound settings, then run test alerts before going live.
In Streamlabs Desktop, go to your scene, click the plus button in Sources, and choose Alert Box from the widget or source options.
Common causes include using the wrong Widget Theme, not saving changes, missing fonts, wrong file assignments, broken widget links or tokens, and not testing each alert type individually.
Open the Alert Box settings, choose the event type you want to edit, then replace or adjust the sound settings for that alert. Streamlabs also provides a dedicated help guide for changing Alert Box sounds.
Widget Themes help you organize and switch between alert widget designs. Streamlabs shows the active theme in the Alert Box area and lets you switch or manage themes from there.
Yes. A follow alert working correctly does not guarantee that donation, raid, membership, or subscriber alerts are also configured correctly. Streamlabs recommends testing alerts as part of the setup process.
Receive an additional 30% discount for your first order by signing up through email!