Streamlabs
Complete Manual Streamlabs Setup Guide for Overlays, Alerts, and Transitions
Manual Streamlabs setup gives you full control over your stream layout, scenes, and source organization in Streamlabs Desktop. Instead of depending on automatic import tools, you can manually place every overlay element, position every widget, organize every scene, and build a setup that is easier to edit, troubleshoot, and improve over time.
If you purchased one of our stream packages and want everything installed properly, this guide will walk you through the full manual process in Streamlabs Desktop. It covers your main live scene, extra screens, alerts, labels, chatbox, social media elements, and stinger transitions. The goal is not just to make your stream look good for one broadcast. The goal is to help you build a cleaner, more reliable setup that stays easy to manage in the long run.
For most streamers, a full manual setup takes around 20 to 45 minutes depending on how many assets are included in the package, how many scenes you want to build, and how customized you want each part of the layout to be. It takes longer than a one-click setup, but it gives you far more control and usually leads to a better result.
From our experience helping streamers set up purchased packages, the most common problems are missing fonts, broken file paths, wrong source order, and alert timing mismatches. That is exactly why this guide focuses on the practical steps that matter most in real Streamlabs setups.
What Manual Streamlabs Setup Means
A manual Streamlabs setup means you add your stream assets one by one inside Streamlabs Desktop instead of relying on an automatic import or quick-install system. You choose the scene structure, source order, naming, grouping, placement, and settings for every piece of the layout yourself.
That includes things like:
- live overlays
- webcam frames
- starting soon screens
- BRB and intermission scenes
- stream labels
- alert box visuals and sounds
- chatbox widgets
- social media elements
- stinger transitions
This approach gives you more control over the final result. It also makes future updates easier because you understand exactly how your setup works. If you ever need to replace a file, update a design, swap an alert animation, or adjust a transition, a well-organized manual setup is much easier to manage than a messy scene collection built with shortcuts.
Who This Guide Is For
This guide is for streamers who want a more professional and flexible setup in Streamlabs Desktop.
It is especially useful if:
- you bought a stream package and want to install it manually
- you want full control over source placement and scene structure
- you want to install overlays, alerts, and transitions individually
- you plan to customize text, labels, and widget placement
- you want a cleaner source list for easier editing later
- you want to understand how your setup works instead of relying on auto-import tools
If that sounds like your goal, manual setup is the right choice.
What You Can Install Manually in Streamlabs Desktop
One reason this page works well as a pillar is that it covers more than just overlays. A proper manual setup can include several different product types.
You can manually install:
- full stream packages
- overlay files for your main live scene
- extra scene screens such as Starting Soon, BRB, and Ending
- alert graphics and sounds
- stinger transitions
- social icons and text elements
- facecam frames
- labels for recent followers, subscribers, tips, and donations
- chatbox widgets
If you purchased a complete package, you will usually be working with several of these assets at the same time. That is why it is important to build your setup in a clean order instead of importing files randomly.
What You Need Before You Start
Before opening Streamlabs Desktop, prepare everything properly. This saves time and prevents many of the most common setup errors.
Make sure you have:
- download and install Streamlabs Desktop from the official website
- your streaming account connected
- your purchased files downloaded and unzipped
- all included fonts installed on your computer
- your webcam and microphone ready
- your gameplay or desktop capture source available
- your package files organized into folders
A simple folder structure helps a lot. For example:
- Main Package Folder
- Overlays
- Alerts
- Transitions
- Screens
- Socials
- Fonts
Do not skip the font step. Missing fonts are one of the most common reasons a design looks wrong after setup. The layout may still work, but the overall stream branding can feel broken if the text does not match the intended style.
It is also important to keep your file paths stable. If you move package files after adding them into Streamlabs Desktop, media and image sources can break because the software no longer knows where the files are stored.
Step 1: Install Streamlabs Desktop and Sign In
If Streamlabs Desktop is not installed yet, install it first and sign in with your streaming platform.
When you first launch Streamlabs Desktop, it may ask if you want to import settings from another streaming application. If your goal is a clean manual setup, it is often better to start fresh. Imported scenes can clutter your workspace and make it harder to organize a new package correctly.
Once you are logged in, confirm that your streaming destination is connected and that the app opens normally before you start adding scenes and sources.
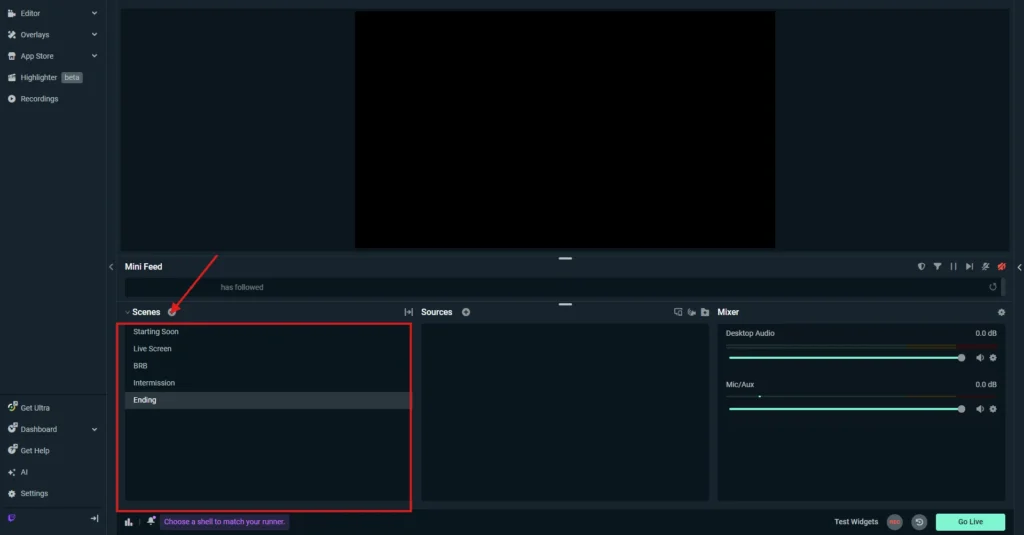
Step 2: Understand Scenes and Sources
Before you install any graphics, you need to understand how Streamlabs Desktop is structured.
What are Scenes?
Scenes are full layouts. Each scene represents a different visual state of your stream.
Common examples include:
- Starting Soon
- Live Screen
- BRB
- Intermission
- Ending Screen
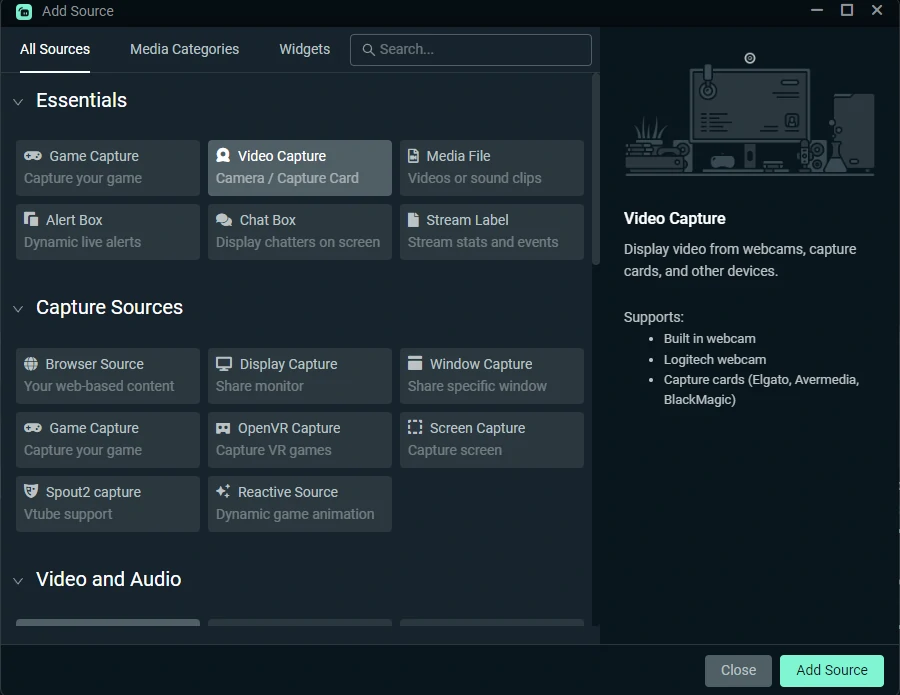
What are Sources?
Sources are the individual elements inside each scene. These are the building blocks of your layout.
Common source types include:
- Game Capture
- Window Capture
- Display Capture
- Video Capture Device
- Image Source
- Media Source
- Browser Source
- Text
- Stream Labels
- Chatbox
- Alert Box
If you understand this difference early, manual setup becomes much easier. Most problems happen because users choose the wrong source type, add assets in the wrong order, or forget how scenes and sources work together.
Step 3: Create Your Scene Structure
Before importing graphics, create the scenes you actually plan to use.
A strong starting scene structure looks like this:
- Starting Soon
- Live Screen
- BRB
- Intermission
- Ending Screen
You can always add more later, but starting with a clean structure makes the setup easier to follow.
Use clear scene names from the beginning. Good naming helps when you switch scenes during a stream, update your package later, or troubleshoot issues in a hurry.
Step 4: Build Your Main Live Scene
Your Live Screen is the most important scene because it is the one your viewers will see the most.
Start by adding your gameplay or display source first. This becomes the base layer of the scene.
Add your gameplay capture
Depending on what you stream, choose the most appropriate capture source:
- Game Capture for supported games
- Window Capture for a specific application
- Display Capture for your whole screen
Check that the capture is working before adding any design elements.
Add your main overlay
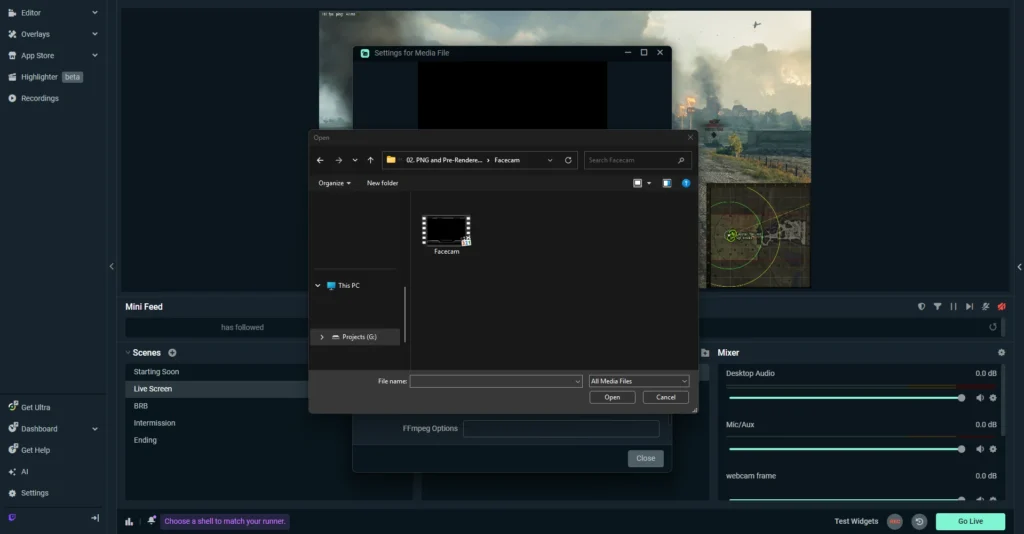
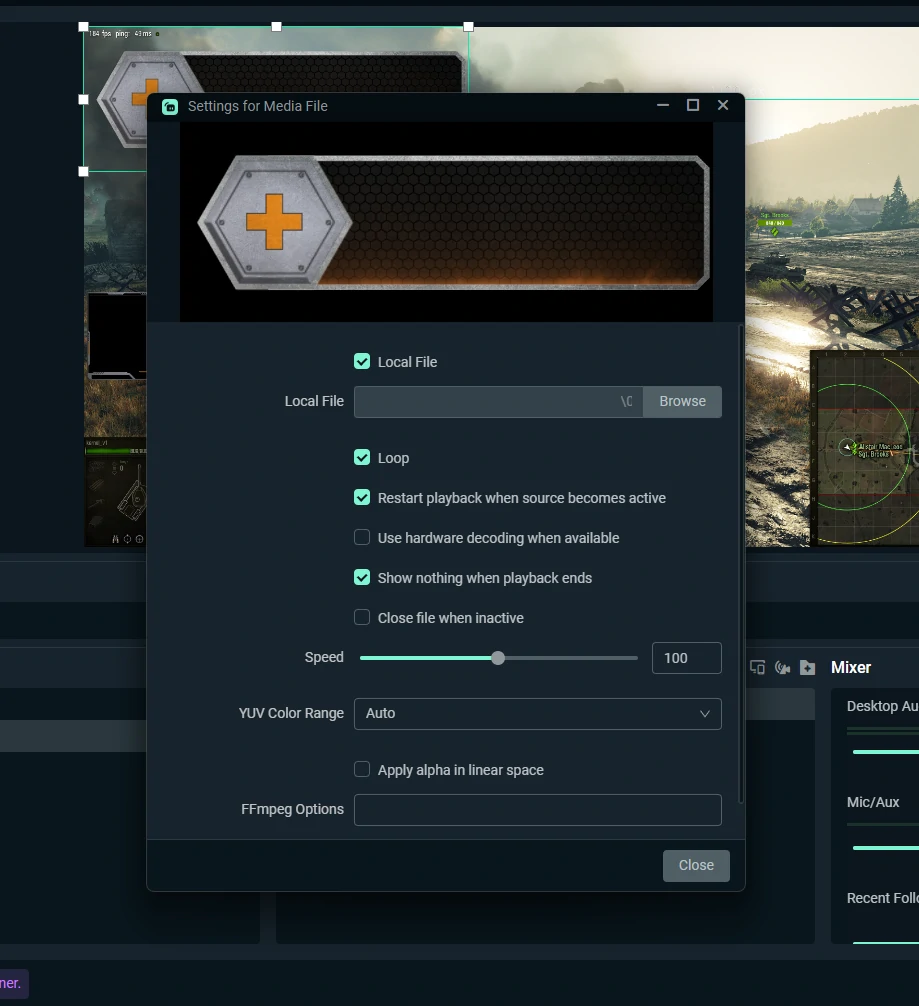
Now add your overlay file. If you are working with files from your stream overlays, choose the correct source type based on the file format.
Use:
- Media Source for animated files such as .webm or .mp4
- Image Source for static .png files
Resize the overlay carefully so it matches the canvas. If the file is animated, make sure Loop is enabled so it does not stop after one cycle.
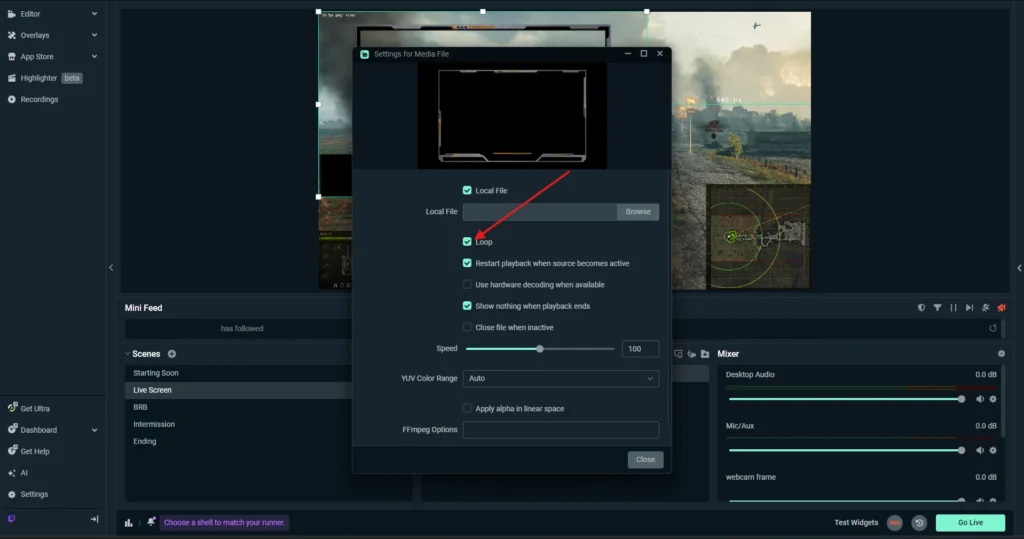
A simple rule helps here: if the asset moves, use Media Source. If it does not move, use Image Source.
Add your webcam
Add a Video Capture Device source for your camera and position it under the facecam frame if your design includes one. If the camera appears above the frame, the whole layout will look wrong even if the overlay itself is correct.
Add text and username elements
If your design includes a nameplate or custom text area, add a Text source and enter your channel name or other content. Double-check the font, size, spacing, and alignment.
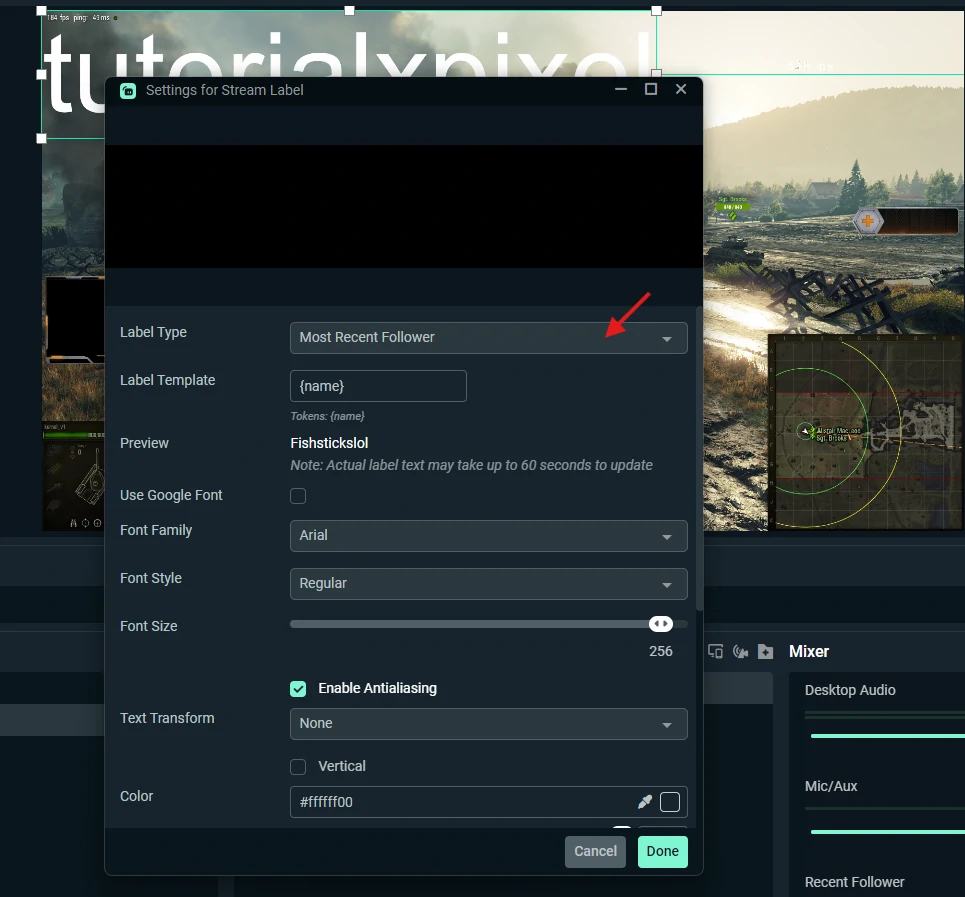
Add stream labels
If your package includes boxes for recent follower, subscriber, top donor, or recent tip, add the correct Stream Label sources and place them where the design expects them.
At the end of this step, your main live scene should already look close to the final layout.
- Add a media file to place the stream label.
- Add Stream Label.

- Select the label type.
Step 5: Organize Your Sources Properly
A lot of streamers rush this part, but source organization is one of the main reasons a manual setup either stays easy to manage or becomes a mess later.
Rename every source clearly.
For example:
- Gameplay Capture
- Main Overlay
- Facecam
- Username Text
- Latest Follower Label
- Chatbox Widget
- Alert Overlay
Group related items into folders whenever possible.
For example:
- Facecam Folder
- Labels Folder
- Socials Folder
- Chatbox Folder
- Alerts Folder
This matters for both editing and troubleshooting. When something breaks during a stream, you do not want to search through a long list of unnamed sources to figure out what went wrong.
A well-organized source list also helps when duplicating scenes. If you ever need a variation of a live screen or intermission screen, clear folders and source names save a lot of time.
Step 6: Add Your Extra Screens
Most stream packages include more than one layout. Once your main live scene is working, add the rest of the screens one by one.
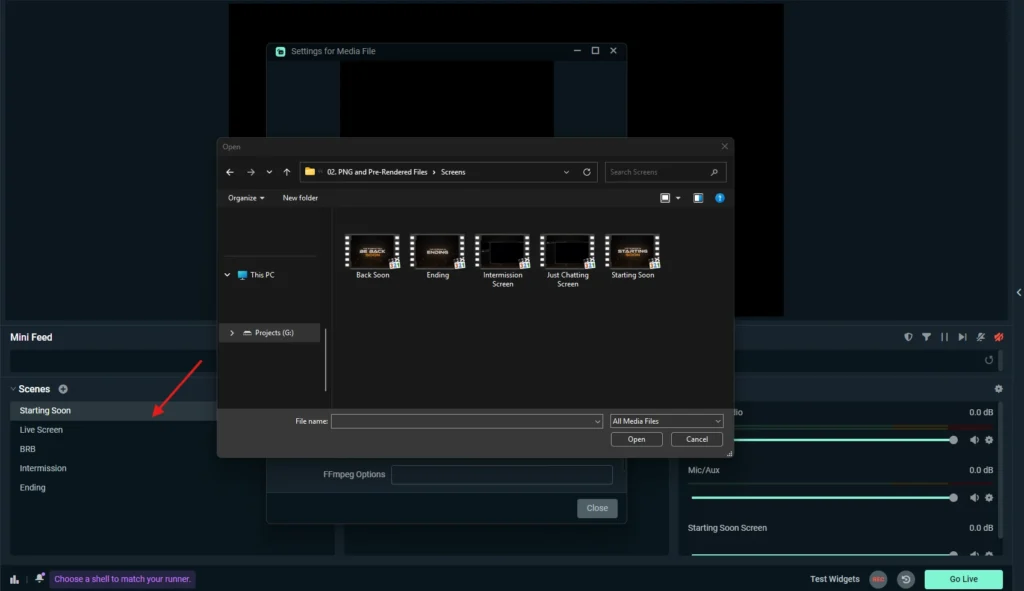
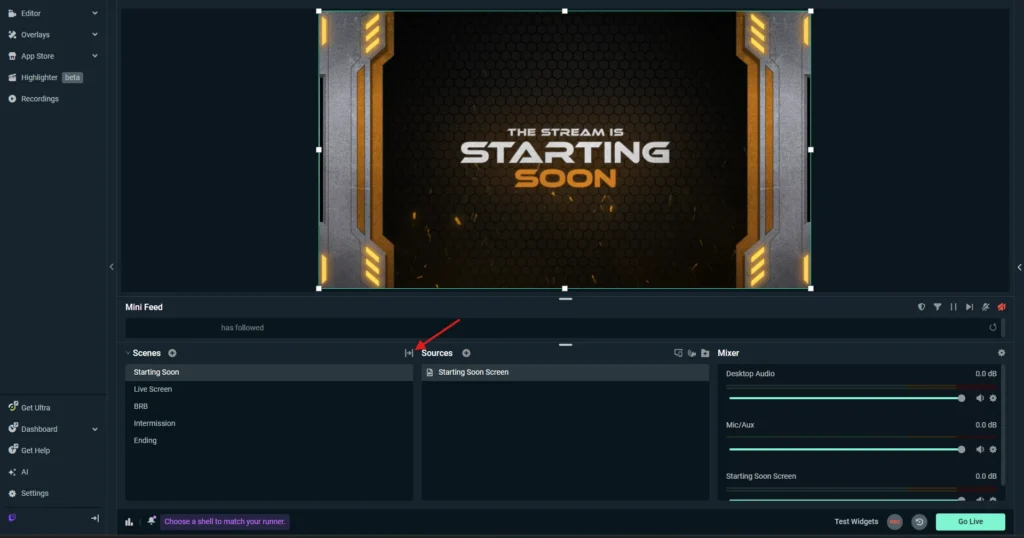
Starting Soon Screen
Create a new scene named Starting Soon. Add the background first, then add any matching text or animated elements included in the package. If the file is animated, make sure looping is enabled.
BRB Screen
Repeat the same process for your BRB scene. Keep related elements grouped together so the layout remains easy to manage.
Ending Screen
Your ending screen usually needs a main background plus any matching text or icon elements. Keep it simple and consistent with the rest of the package.
Intermission Screen
The intermission scene often includes more elements than other screens. It may contain:
- a facecam frame
- a gameplay frame
- a chatbox section
- social media handles
- labels or custom text
Because of this, the intermission scene is often where source organization matters most. Build it carefully and keep each group separate so editing later stays easy.
Step 7: Add Chatbox and Social Media Elements
A complete setup is not only about overlays and alerts. Chatbox and social elements also help the stream feel polished.
Chatbox
If your package includes a chatbox area, you usually need two parts:
- the visual frame from the package
- the actual chat widget inside Streamlabs Desktop
Add the visual frame first, then place the widget inside the correct space. Resize it until the chat fits naturally within the design.
Social media elements
If your package includes social icons, usernames, or platform tags, add the icon files and then create a text source for your handle or channel name. Group each icon with its related text.
This is a small detail, but it helps build a stronger visual identity across all your scenes.
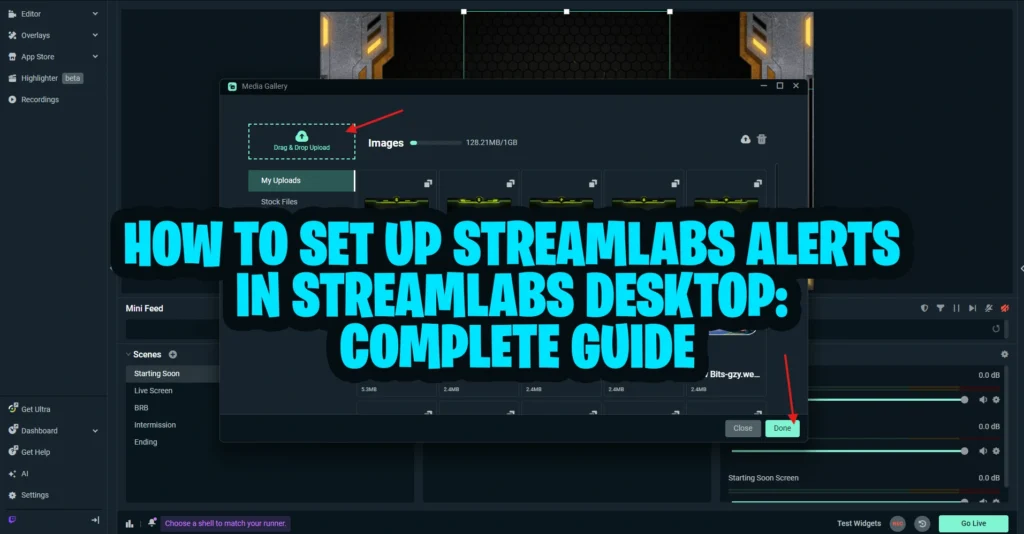
Step 8: Set Up Streamlabs Alerts Manually
This is one of the most important sections of the entire guide, especially if you are merging your old alert content into this page.
Alerts are a major part of the live stream experience. When someone follows, subscribes, raids, donates, or sends a tip, the alert needs to look right, sound right, and appear at the right time. If your alerts are broken, mistimed, or styled inconsistently, it makes the stream feel unfinished.
If you are using assets from your stream alerts, configure them carefully one alert type at a time.
Need a deeper walkthrough for Alert Box setup, custom media, text formatting, duration, sounds, and testing? Read our full Streamlabs alerts setup guide.
Where to upload custom alert image or video
Open your Alert Box settings inside Streamlabs Desktop and go through each alert type individually.
- Add Alert Box
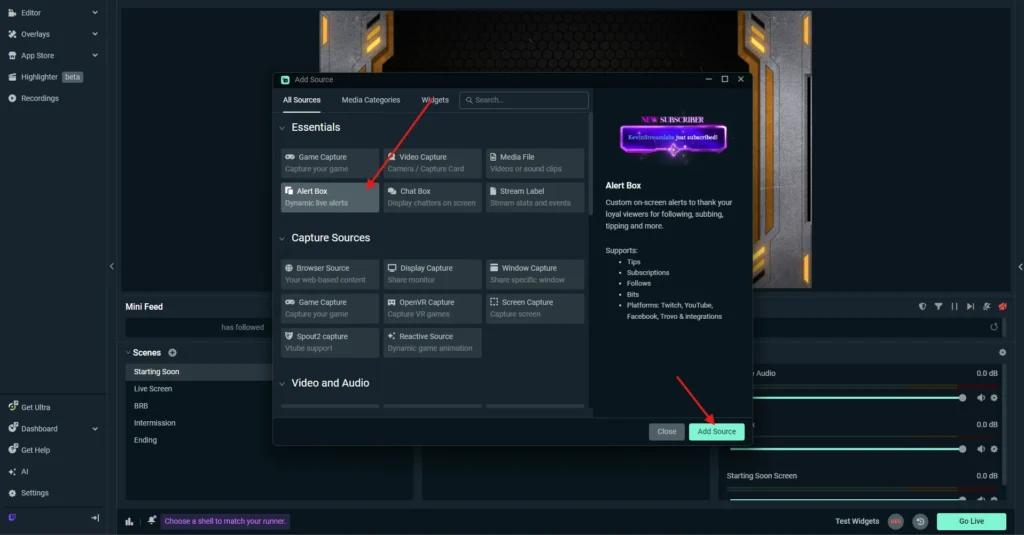
- Change Media
- Upload alert design

Typical alert types include:
- Follow
- Subscriber
- Donation
- Raid
- Membership
- Tip
For each alert type, upload the correct custom media file from your package. Depending on the design, that may be a static image, an animated file, or a matching sound.
Keep the filenames organized so you do not accidentally upload the wrong media to the wrong alert type.
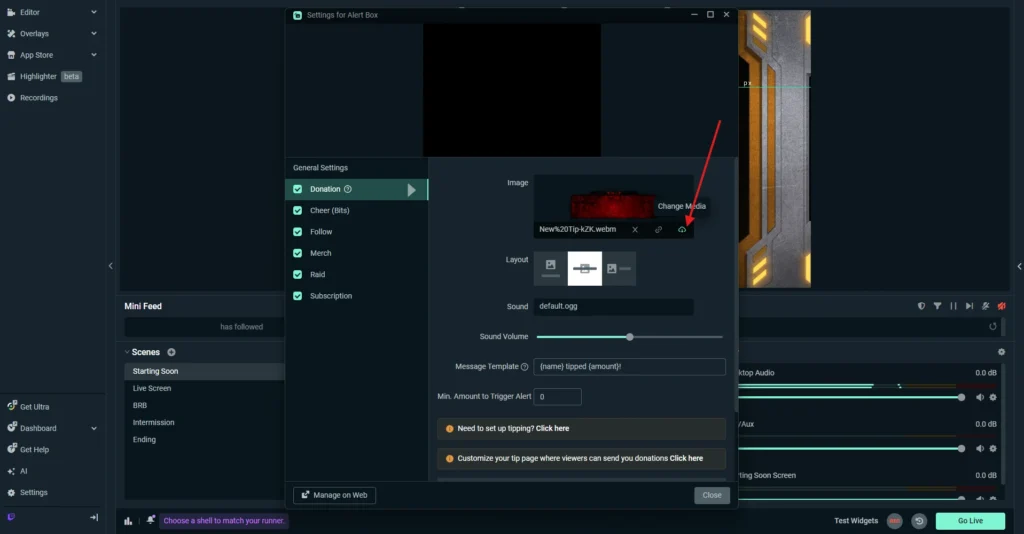
How to change text formatting
Each alert usually includes text such as the username, event type, or custom message. Review the text formatting for every alert type.
Check and adjust:
- font style
- text size
- text color
- alignment
- text position
- capitalization style
- message format
If the alert design follows a certain aesthetic, your text should match it. Even a good alert graphic can feel inconsistent if the font or color treatment looks out of place.
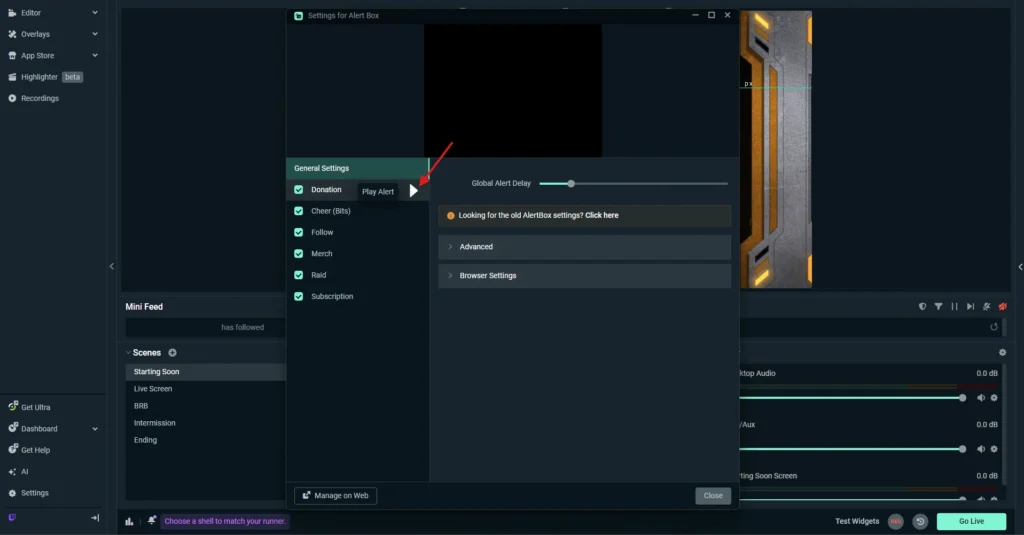
How to set alert duration
Alert timing matters more than most streamers realize.
Set the alert duration carefully so that:
- the visual animation has enough time to play
- the sound does not get cut off
- the alert stays visible long enough to be readable
- the alert does not stay on screen so long that it becomes distracting
If your animation lasts longer than the alert duration, the alert may disappear too early. If the duration is too long, the alert can feel awkward and slow.
How to test each alert type
Never assume that one working alert means all of them are set up correctly. Test each type individually.
Run test alerts for:
- follow
- subscriber
- donation
- raid
- membership
- tip
Make sure the media appears, the text is readable, the timing feels correct, and the sound volume is balanced with your mic and game audio.
Common alert issues
Here are the most common alert problems during manual setup:
- the wrong media file is uploaded
- the text formatting does not match the design
- the alert duration is too short or too long
- the sound is too loud or too quiet
- one alert type works but another is still using default settings
- animation and sound timing feel mismatched
A clean alert setup should feel smooth, branded, and readable without distracting too much from the stream itself.
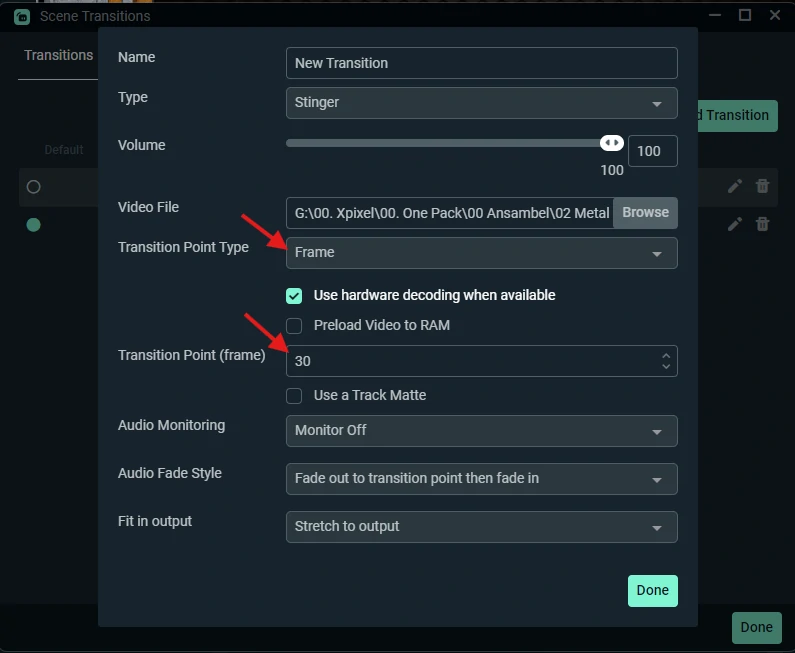
Step 9: Add Your Stinger Transition
If your package includes a stinger transition, install it after your main scenes are ready.
Open the scene transition settings, create a new transition, and set the type to Stinger. Then upload the transition file from your package. If you are using one of our stream transitions, make sure the file is assigned to the correct transition slot.
Then adjust the timing so the actual scene switch happens at the correct point in the animation.
This is important because a poorly timed stinger makes the stream feel unpolished. If the scene changes too early or too late, the transition no longer looks smooth.
- Edit Scene Transitions
- Add Transition
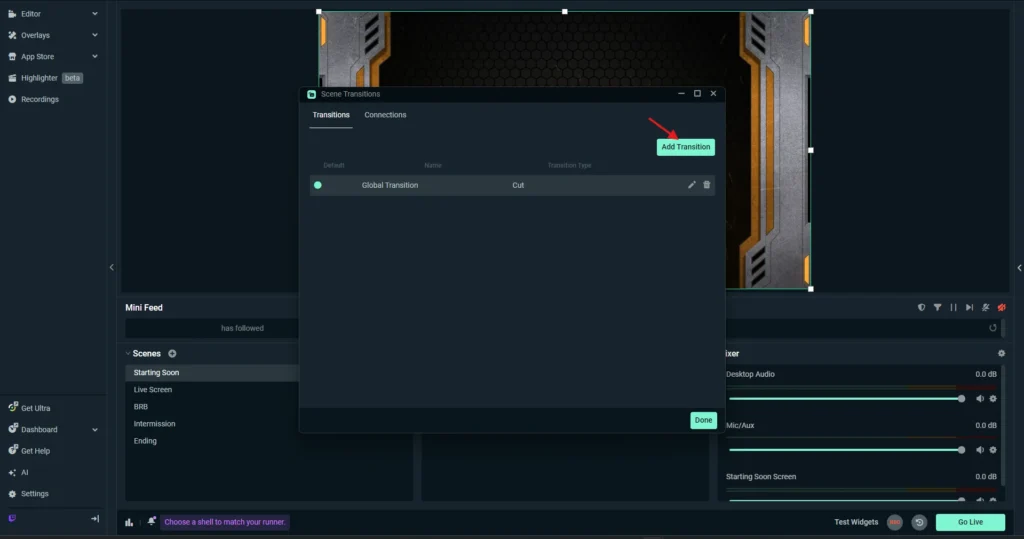
- Select Transition Type to Stinger
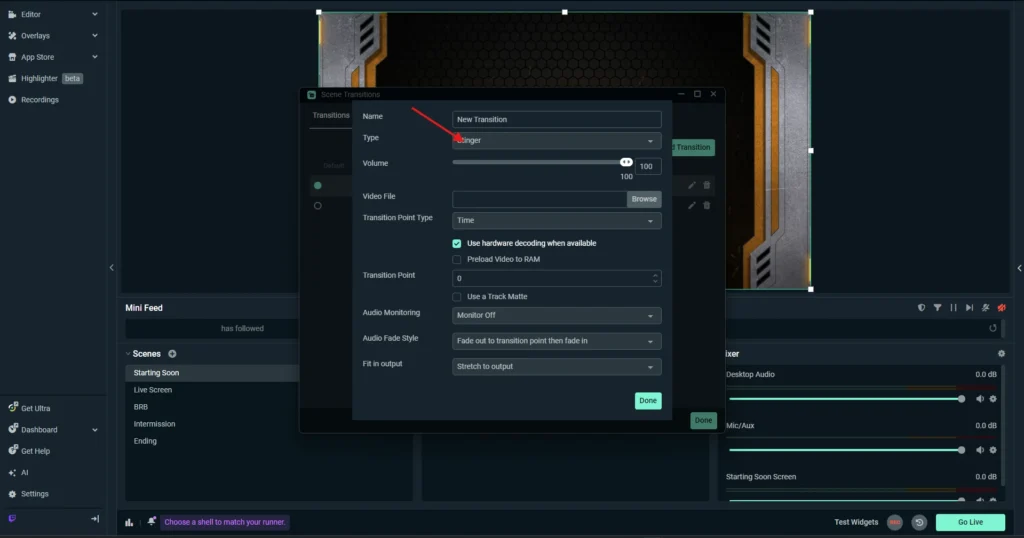
- Browse Video File Transition

- Select New Transition

- Adjust Transition Point
Test your transition between the scenes you use most often, especially:
- Starting Soon to Live Screen
- Live Screen to BRB
- BRB to Live Screen
- Live Screen to Intermission
A good stinger should feel clean, fast, and intentional.
Step 10: Check Audio and Basic Output Settings
Even though this is a visual setup guide, you still need to do a quick technical review before going live.
Audio checklist
Make sure you can hear and control:
- microphone audio
- desktop audio
- game audio
- alert sounds
Watch for duplicate audio sources. That is one of the most common Streamlabs issues and often causes echo or doubled sound.
Basic output settings
Review your:
- resolution
- FPS
- bitrate
- encoder
You do not need to turn this page into a deep technical settings guide, but you do need to make sure your system can run the setup smoothly. A stream that looks good but drops frames constantly is not a good result.
Step 11: Test Everything Before You Go Live
This step is essential.
Before using the setup on a real stream, test the full scene collection.
Final pre-stream checklist
- overlays are visible and aligned correctly
- webcam fits inside the frame
- labels are readable
- chatbox appears in the correct area
- alerts trigger correctly
- transitions switch at the right moment
- text styles match the package design
- no sources are accidentally hidden
- audio is balanced
- no major lag or frame drops appear
A short private stream or local recording is often enough to catch most problems before your audience sees them.
Common Manual Streamlabs Setup Problems and Fixes
Overlay is not showing
You may have used the wrong source type or imported the file incorrectly. Animated files usually need Media Source, while static graphics usually need Image Source. Also confirm that the source is visible and the file path is still valid.
Animated overlay only plays once
Enable Loop inside the Media Source settings.
Webcam does not fit the frame
Your camera source is probably above the frame or needs resizing. Move it below the frame and adjust it carefully until it fits.
Fonts do not match the design
Install the package fonts before editing text inside Streamlabs Desktop. If the fonts are missing, the software may replace them with a default font.
Alerts are not showing correctly
Check the media upload, text settings, sound settings, and duration for that alert type. Also make sure the file path still works and that you tested the correct alert type.
Stinger transition feels mistimed
Adjust the stinger timing until the scene switch matches the animation naturally.
Source list is messy and hard to manage
Rename your sources and group them into folders. This is one of the biggest quality-of-life improvements in any manual setup.
Files stopped working after moving folders
If you move media files after adding them into Streamlabs Desktop, the software may lose the file path. Keep package files in one stable location from the start.
Manual Setup vs Easy Setup
Manual setup and easy setup both have their place.
Choose manual setup if you want:
- full control over every source
- better organization
- easier troubleshooting
- more customization
- cleaner long-term editability
Choose easy setup if you want:
- fewer steps
- faster installation
- a quicker way to get started
For streamers who want flexibility, cleaner structure, and more control over the final result, manual setup is usually the better choice.
Final Thoughts
A complete manual Streamlabs setup takes more time at the beginning, but it gives you much better control over your stream layout and source organization.
You are not just importing files. You are building a setup that you understand. That matters when you want to improve the stream later, switch assets, fix problems quickly, or create new scene variations without losing control of the structure.
If you organize your package files properly, build each scene in a logical order, configure your alerts carefully, test every key element, and keep your source list clean, you will end up with a more professional setup that is far easier to maintain.
That is the real value of manual setup. It is not only about installation. It is about long-term control.
FAQ
How do I manually install overlays in Streamlabs Desktop?
Add your gameplay or display source first, then import your overlay as either a Media Source or Image Source depending on the file format. After that, add your webcam, labels, text, chatbox, and other assets in the correct layer order.
What is the difference between manual setup and easy setup in Streamlabs?
Manual setup means you add scenes, sources, overlays, alerts, and transitions yourself. Easy setup usually imports most of the package automatically. Manual setup gives you more control, while easy setup saves time.
How do I manually set up Streamlabs alerts?
Open the Alert Box settings, choose each alert type one by one, upload the correct media, adjust the text and sound settings, set the duration correctly, and test every alert before going live.
Why is my Streamlabs overlay not showing?
The most common reasons are using the wrong source type, having the source hidden, using a broken file path, or placing the source in the wrong layer order.
How do I manually install a stream package in Streamlabs Desktop?
Start by organizing your package files, creating your scene structure, and then adding each asset manually. Begin with your live scene, then install overlays, webcam frames, labels, extra screens, alerts, chatbox, social elements, and transitions one by one. Finish by testing everything before you stream.
Why are my Streamlabs alerts not showing correctly?
The most common causes are wrong media uploads, broken file paths, incorrect text formatting, duration settings that do not match the animation length, muted alert sounds, or forgetting to test each alert type individually.
Our Products