Streamlabs
How to Add Overlays to Streamlabs Desktop: Easy Setup Guide
If you are wondering how to add overlays to Streamlabs, the fastest method is usually easy setup with a one-click import workflow. Instead of building every scene from scratch, importing every source manually, and placing every element one by one, you can install a compatible overlay package in just a few steps and get your stream looking polished much faster.
This guide explains how to add overlays to Streamlabs Desktop using an easy setup approach, including overlay import, scene review, alert setup, and the post-import checks that matter most before you go live. If you are installing a pre-made overlay package, this workflow is usually the fastest way to get started. The goal is not only to save time. The goal is to help you install your stream package correctly, avoid common mistakes, and still keep enough control to customize your layout after import.
For many streamers, this is the best middle ground between a fully manual build and a generic default scene collection. You get speed, a professional look, and less setup friction, while still keeping the ability to tweak your webcam, labels, alerts, and scene organization.
From our experience helping streamers install quick-import packages, the most common issues are choosing the wrong file, skipping font installation, importing the overlay into the wrong scene collection, forgetting to test alerts, and assuming one-click setup means zero checking afterward. Easy setup is fast, but it still works best when you follow a clean process.
What This Guide Is For
This guide is for streamers who want to install overlays in Streamlabs Desktop quickly without spending hours rebuilding scenes manually.
It is especially useful if:
- you purchased a stream package that includes a .overlay file
- you want a faster way to install overlays and alerts
- you want a setup that looks polished with less manual work
- you are new to Streamlabs Desktop and want a simpler starting point
- you want to import a package, then make small edits instead of building from zero
If your goal is speed and simplicity, this article is for you.
If your goal is total control over every source, layer, widget, and scene, a manual setup guide is still the better destination. This easy setup page is designed for people who want to get up and running fast, then fine-tune only what they need.
What Easy Setup Means in Streamlabs Desktop
Easy setup in Streamlabs Desktop usually means importing a compatible package instead of manually adding every source one by one.
In practical terms, that often includes:
- a .overlay file that imports scenes and design elements
- prebuilt layouts for live, starting soon, BRB, and ending scenes
- easier alert setup through a preloaded alert workflow
- faster installation of matching themes or design variations
- less manual layering and less source-by-source work
This is the core idea behind one-click setup.
So while the phrase “one-click” sounds like the entire setup is automatic, the real advantage is this: most of the heavy lifting is done for you, and the rest becomes a lighter customization process instead of a full manual build.
Why Easy Setup Is Useful for Streamers
Easy setup matters because most streamers do not actually struggle with creativity. They struggle with time, confusion, and friction.
A polished stream layout requires a lot of moving parts:
- overlays
- scenes
- alerts
- social elements
- transitions
- text styling
- webcam placement
- source order
When you install all of that manually, even a good package can feel overwhelming. Easy setup removes most of that friction and helps you move from downloaded files to a working stream layout much faster.
That is why this topic works as a pillar. It is not just a technical tutorial. It solves a real problem for new and growing streamers: getting a professional stream layout live without spending an entire afternoon wrestling with sources.
What You Need Before You Start
Before you import anything, prepare your files properly. This makes easy setup much smoother.
You should have:
- Streamlabs Desktop installed
- your package downloaded and unzipped
- the .overlay file ready
- any included fonts installed
- your alert files or alert shortcut folder available
- your webcam and microphone ready
- your streaming account connected in Streamlabs Desktop
A lot of quick-import problems start before Streamlabs even opens. The package may still be zipped, the fonts may be missing, or you may click the wrong file instead of the .overlay file.
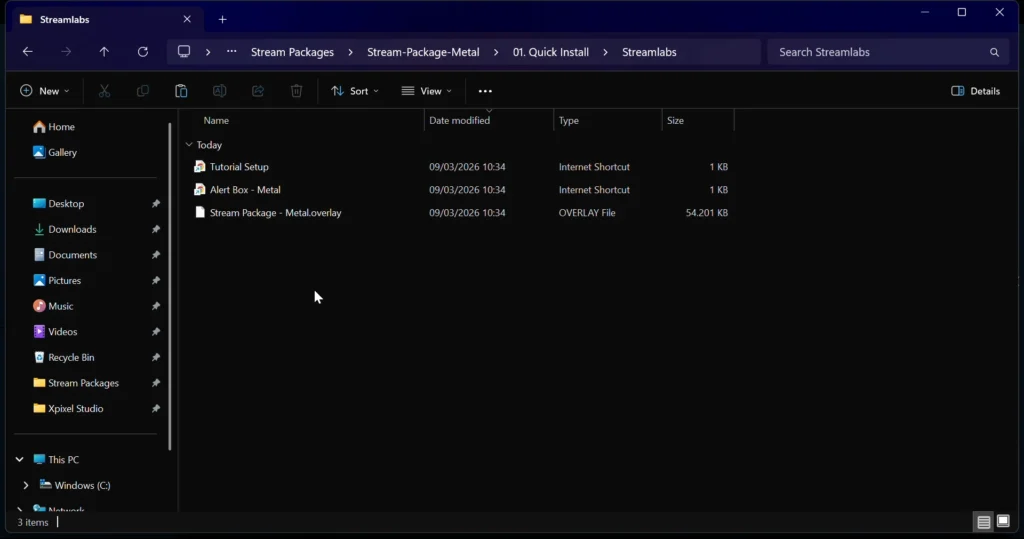
That is why it helps to organize the package first.
A simple structure works well:
- Installation Folder
- Alerts Folder
- Fonts Folder
- Screens Folder
- Read Me or Instructions
The most important file for this guide is usually the .overlay file inside the installation folder.
If your package includes more than one design variation, keep those files clearly labeled so you do not import the wrong version.
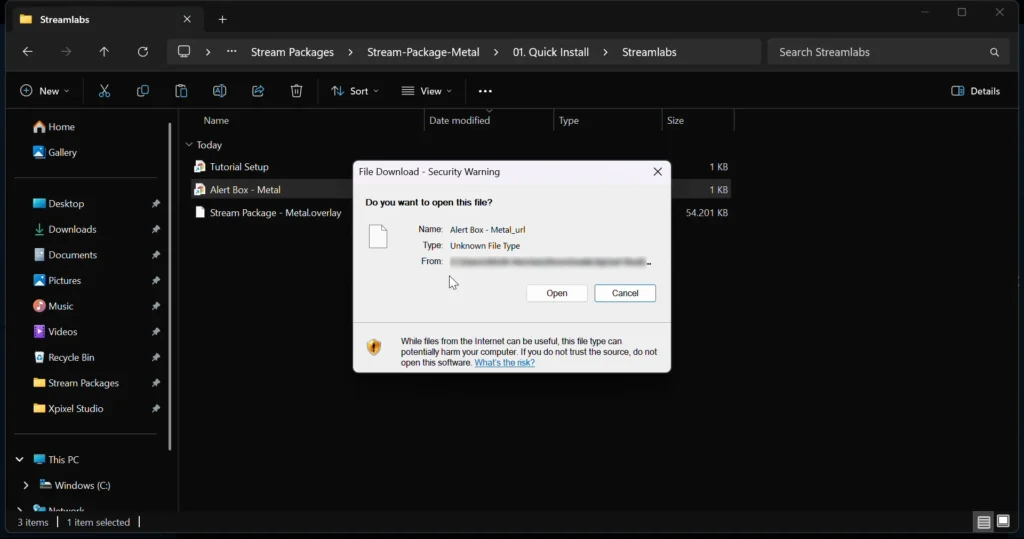
Step 1: Open Streamlabs Desktop and Import the Overlay File
This is the heart of the easy setup workflow.
To import your overlay package into Streamlabs Desktop:
- Open Streamlabs Desktop
- Go to Settings
- Open Scene Collections
- Choose Import Overlay File
- Select the correct .overlay file from your installation folder
- Open the file and allow Streamlabs Desktop to import the package
If the package is compatible and the file is correct, Streamlabs Desktop should import the overlay package into your scene collection. That typically includes your core design structure, which may contain a live screen, extra scenes, labels, visual elements, and sometimes transitions or scene presets depending on the package.
If you want to compare this process with the official Streamlabs overlay guide, you can review their instructions for importing an overlay file into Streamlabs Desktop.
What to check immediately after import
Once the import finishes, do not assume the job is done. Review these things right away:
- did the correct scene collection appear
- are the scene names readable and organized
- do the visual files load correctly
- are any sources missing
- do the fonts look right
- is the imported layout using the design variation you expected
This is where easy setup becomes more than “click and done.” The import is fast, but the review step is what keeps the end result professional.
Step 2: Review the Imported Scenes and Layout Variations
After importing your .overlay file, spend a few minutes reviewing the scene collection.
Most quick-import packages include multiple scenes or multiple layout variations.
Review the main scenes
Look through the imported scenes one by one:
- Live Screen
- Starting Soon
- BRB
- Intermission
- Ending Screen
Make sure the layout matches the package you expected to install.
Check for theme or style variations
Some packages include multiple visual themes, color variations, or scene alternatives. If your import includes a dropdown or multiple scene collections, check which version you want to use before you begin customizing.
This matters because some streamers start editing a scene right away, then later realize they opened the wrong design variation and have to repeat work.
Confirm source visibility
Even in easy setup, it is still worth checking:
- webcam frame visibility
- gameplay area placement
- text box positions
- label containers
- chatbox areas
- background media playback
If anything looks off, it is better to catch it now than during your first live test.
Step 3: Connect Your Webcam, Gameplay, and Basic Sources
One-click setup usually handles the design structure, but you still need to connect your live inputs.
That typically includes:
- webcam
- gameplay capture
- desktop audio
- microphone
- browser-based widgets if needed
Add your webcam
If the imported package includes a facecam frame, add your webcam source and position it correctly inside the frame. Usually that means adding a Video Capture Device source and checking the fit.
One of the most common easy setup mistakes is assuming the imported frame also imports your actual webcam device. It does not. The frame may be present, but you still need to connect your live video source.
Add your gameplay source
Depending on your use case, you may need:
- Game Capture
- Window Capture
- Display Capture
Add the correct source and make sure it fits the gameplay area in the imported design.
Check your labels and widgets
If the imported package includes stream labels or event widgets, make sure they appear where they should. Sometimes the visual frame imports correctly, but the live data source still needs to be connected or checked.
At this stage, your imported package should start looking like a real stream layout rather than a static design file.
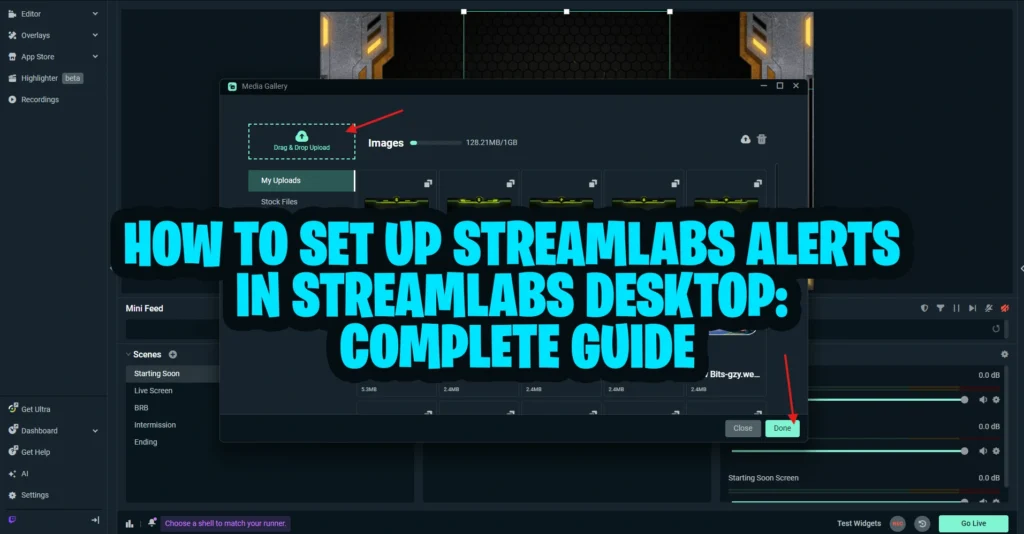
Step 4: Set Up Alerts the Easy Way
For many users, easy setup is not only about overlays. It is also about reducing the time spent configuring stream alerts.
That makes this section essential for the pillar.
How to start the alert setup
Use the alert shortcut or open the alert setup workflow provided with your package. Then:
- Open the Alert Box Shortcut
- Let it open in your browser
- Then Click “Use” on the Default option.
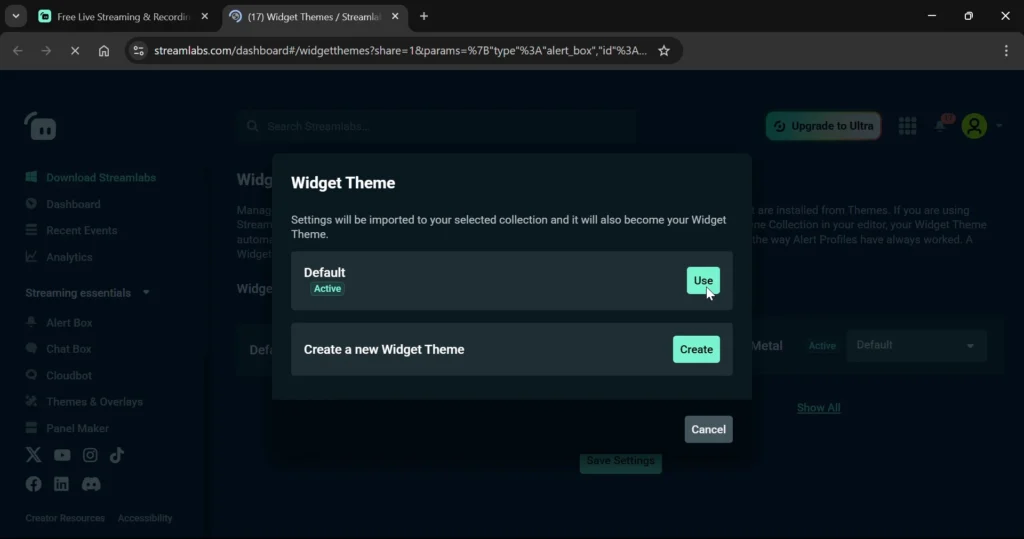
Install each alert type one by one
Once the theme is active, go through each alert type one at a time. Do not assume every alert type is already perfect.
Check:
- Follow alerts
- Subscriber alerts
- Donation alerts
- Raid alerts
- Membership alerts
- Tip alerts
Adjust the settings that matter most
Even in an easy setup flow, there are still a few settings you should review:
- alert duration
- text delay
- sound volume
- font style
- text color
- animation style
- layout position
One of the most practical tips here is to match the alert duration to the actual length of the animation. If the alert disappears too soon, the design looks broken. If it stays too long, it can distract from the stream.
Test every alert type
Once your alerts are set up, test them.
This is non-negotiable.
Use the test buttons in Streamlabs Desktop and make sure:
- the correct animation appears
- the sound plays
- the text is readable
- the alert feels the right length
- the widget theme is actually active
For a deeper walkthrough of Alert Box settings, custom media, text formatting, timing, sounds, and testing, follow our full Streamlabs alerts setup guide.
Step 5: Customize the Imported Overlay Without Breaking It
Easy setup is fast, but most streamers still want to personalize the result.
That usually means making small edits, not rebuilding the whole package.
Safe customizations after import
These are the easiest changes to make after importing:
- resize your webcam
- update your username text
- adjust alert volume
- tweak label placement
- change chatbox size
- switch to another included theme variation
- hide a scene you do not use
- rename scenes for clarity
What not to over-edit right away
If you are new to Streamlabs Desktop, avoid making too many changes immediately after import.
Do not start by:
- renaming every source at once
- changing all fonts
- removing large groups of sources without testing
- rebuilding the alert structure immediately
- deleting scenes before checking what they do
The best approach is to get the imported package working first, then make controlled edits.
Step 6: Check Audio, Performance, and Dashboard Basics
Even though this page is about overlays, a quick setup is not truly successful if the stream still sounds bad or lags.
Audio basics
Check that your:
- microphone is active
- desktop audio is working
- gameplay audio is not too loud
- alert sounds are balanced
A bad audio mix ruins the benefit of a polished overlay.
Dashboard basics
If you use Streamlabs Desktop regularly, arrange your main windows so you can see the things that matter most while live, such as:
- chat
- activity feed
- alert feed
- recent events
You do not want to scroll around searching for important live information while streaming. A clean dashboard is part of a smooth stream workflow.
Performance basics
Review the basics:
- bitrate
- dropped frames
- CPU usage
- resolution
- encoder
Easy setup saves time on scene building, but you still need a stable stream.
Step 7: Save, Back Up, and Protect Your Imported Setup
This is one of the smartest easy-setup habits you can build.
Once your import is working and your tweaks are done, protect the setup.
What to protect
After your overlay package is imported and reviewed:
- save your scene collection
- back up your Streamlabs profile if possible
- keep the original downloaded files organized
- do not move media files randomly after import
A working quick-import setup is valuable. Treat it like something worth protecting.
Step 8: Test Everything Before You Go Live
This is where easy setup becomes a finished setup.
Before you stream, run a complete check.
Pre-stream easy setup checklist
- the imported overlay displays correctly
- all scenes load
- your webcam fits inside the frame
- gameplay appears in the correct area
- labels and widgets show up correctly
- alerts trigger properly
- alert sounds are balanced
- transitions feel smooth if included
- fonts match the package design
- nothing looks broken or missing
A short private stream or local recording is enough to catch most of the problems that matter.
This is also where easy setup proves its value. Instead of spending hours building from zero, you are testing and polishing a package that is already mostly assembled.
Common Easy Setup Problems and Fixes
The .overlay file will not import
Make sure you selected the correct file from the installation folder. A lot of users click the wrong file or try to import something other than the actual .overlay file.
The design imported, but fonts look wrong
Install the fonts included with the package, then reopen or refresh the relevant text elements.
The wrong scene collection appears
Some packages include multiple themes or scene variations. Double-check which design variation you imported and which one is active.
Alerts are still using old settings
Make sure you created and activated the correct widget theme, then test each alert type again.
The layout looks right, but gameplay or webcam is missing
The design can import without your live devices. Add your webcam and gameplay capture manually after the import.
The alert works, but the timing feels off
Adjust the alert duration and text delay so the visual and sound feel natural.
Sources or files break later
Do not move imported media files around after setup. Broken file paths are one of the easiest ways to damage a working layout.
The stream looks good, but the dashboard feels messy
Rearrange the dashboard windows you use most so you can manage the stream more comfortably while live.
Easy Setup vs Manual Setup in Streamlabs Desktop
Easy setup and manual setup both have their place. If you want complete control over every source, scene, and widget, a full manual setup guide is still the better option.
Choose easy setup if you want:
- the fastest possible setup
- a professional result with less work
- scene and overlay import in just a few steps
- a simpler starting point for new streamers
- enough customization without building everything from zero
Choose manual setup if you want:
- complete control over every source
- full scene-by-scene customization
- custom source grouping and naming
- detailed manual alert configuration
- more advanced editing freedom
For most new users, easy setup is the better starting point. It gets you live faster, reduces the chance of setup overwhelm, and still leaves room for personalization.
For advanced users who want full control, manual setup remains the better long-term workflow.
Final Thoughts
Learning how to add overlays to Streamlabs Desktop does not have to be complicated.
If your package includes a quick-import workflow, easy setup is often the fastest and cleanest way to get a professional stream design running. Instead of manually building every scene and every source, you import the package, review the scene collection, connect your live inputs, configure alerts, and make only the edits you actually need.
That is why this approach works so well as a pillar topic. It solves a real setup problem for real streamers.
When done properly, easy setup gives you three big wins:
- speed
- simplicity
- a polished visual result
And that is exactly what most streamers want when they are trying to get live without wasting time.
FAQ
How do I add overlays to Streamlabs Desktop?
Open Streamlabs Desktop, go to Settings, then Scene Collections, and choose Import Overlay File. Select the correct .overlay file from your installation folder and let Streamlabs import the package.
What is a .overlay file in Streamlabs?
A .overlay file is a package file used to import a prebuilt overlay setup into Streamlabs Desktop. It can help bring in scenes and visual structure much faster than manual setup.
Is easy setup better than manual setup in Streamlabs?
Easy setup is better if you want speed and simplicity. Manual setup is better if you want maximum control over every source and scene.
How do I set up alerts after importing an overlay in Streamlabs?
Open the alert shortcut or alert box workflow included with the package, create a new widget theme, activate it, then review and test each alert type one by one.
Why is my Streamlabs overlay not importing correctly?
The most common causes are selecting the wrong file, not unzipping the package first, importing the wrong theme variation, or using files that were moved after download.
Do I still need to customize anything after one-click setup?
Usually yes. Even after a successful import, you still need to connect your webcam, add gameplay capture, review labels, test alerts, and make sure everything looks correct before streaming.
Can I change the imported layout after easy setup?
Yes. You can usually adjust webcam size, text, labels, alerts, and some scene elements after import without rebuilding the whole package.
Our Products